In the vast world of Minecraft, iron stands as a cornerstone resource, pivotal for upgrading tools, constructing robust structures, and crafting intricate mechanisms. However, the finite nature of iron ore deposits mandates players to delve deeper into uncharted territories for replenishment. Enter the ingenious solution of an iron farm—a game-changer that promises an endless supply of iron ingots with minimal effort. This guide is designed to navigate you through the process of constructing your own iron farm, eliminating the need for exhaustive mining expeditions. Whether you’re a novice embarking on your first Minecraft adventure or a seasoned veteran looking to optimize resources, mastering how to create an iron farm in Minecraft will revolutionize your gameplay experience. Let’s embark on this journey to ensure your iron reserves never dwindle again.
Iron Farms in Minecraft

At the heart of Minecraft’s innovative gameplay is the ability to harness the mechanics of the game to create self-sustaining systems, one of which is the iron farm. Iron farms exploit the mechanics of Iron Golem spawning, turning a once manual and hazardous task into a seamless, automated process. In essence, an iron farm operates by continuously spawning Iron Golems and then systematically leading them to their demise to harvest iron ingots.
This ingenuity lies in manipulating the game’s mechanics, where villagers’ presence within a certain proximity triggers the spawning of Iron Golems to protect them. By setting up a controlled environment, players can ensure a steady flow of iron without the need to mine or confront these formidable entities directly. The farm’s design leverages simple game mechanics to fulfill complex needs, making it an essential setup for players aiming for efficiency and sustainability in their Minecraft endeavors.
Materials Needed to Create an Iron Farm in Minecraft
To embark on the construction of your iron farm, a precise list of materials is required to ensure the smooth execution of your project. Here’s what you’ll need:
- 4x Hoppers: Essential for collecting the iron ingots from the fallen Iron Golems.
- 2x Chests: These will store the iron ingots collected by the hoppers.
- 6x Slabs: Used in various parts of the farm to prevent mob spawns and manage the flow of water.
- 3x Beds: To establish the “village” that triggers Iron Golem spawning.
- 3x Trapdoors: These play a crucial role in guiding the Iron Golems to their fate.
- 1x Boat: A unique method to secure the zombie needed in the farm’s mechanism.
- 8x Signs: To hold the lava in place and ensure the Iron Golems are correctly guided.
- Torches: To light up the area and prevent unwanted mob spawns.
- Solid Building Blocks: For the structure of the farm.
- 2x Water Buckets and 2x Lava Buckets: Essential for the farm’s mechanism to move and eliminate the Iron Golems.
- 1x Shovel: For creating path blocks around the farm to control the spawn areas of the Iron Golems.
Gathering these materials might seem like a daunting task, but it’s a small price to pay for the endless supply of iron they will help you secure. With these items at the ready, you’re well on your way to constructing a functional iron farm in Minecraft.
Also Read: How to Make Pumpkin Pie in Minecraft
Step-by-Step Guide to Building Your Iron Farm in Minecraft
Building an iron farm in Minecraft requires precision and patience, but the rewards are immeasurable. Follow this detailed guide to construct your very own efficient iron farm.
Step 1: Preparing the Site
- Begin by digging a 7×6 hole that is two blocks deep. This will serve as the foundation of your iron farm.
Step 2: Creating a Special Chamber
- On one of the longer sides, leave a block gap and then dig a 3×3 hole, extending four blocks deep. This chamber will play a critical role in the farm’s operation.
Step 3: Constructing the Villager Room
- Jump into the newly created chamber and dig out a room opposite to the entrance with dimensions of 3x2x2 (LxWxH). Then, create a staircase for easy access, ensuring to block off the exit with two trapdoors.
Step 4: Setting Up the Beds and Light
- In the villager room, place three beds, two slabs, and a trapdoor. It’s crucial to add torches around these items to prevent any hostile mob spawns that could disrupt the farm’s efficiency.
Step 5: Introducing the Boat and More Lighting
- Position a boat next to the beds as designated. This boat will be used to trap a zombie later on. Also, ensure each step of the staircase is well-lit with torches to maintain safety and visibility.
Step 6: Bringing in Villagers and a Zombie
- Transport three villagers to your farm using boats, positioning them near the beds. When it’s nighttime, break the boats to free the villagers. Then, lure a zombie into the farm, using the staircase, and trap it in the boat placed earlier. To prevent the zombie from despawning, make sure to name it.
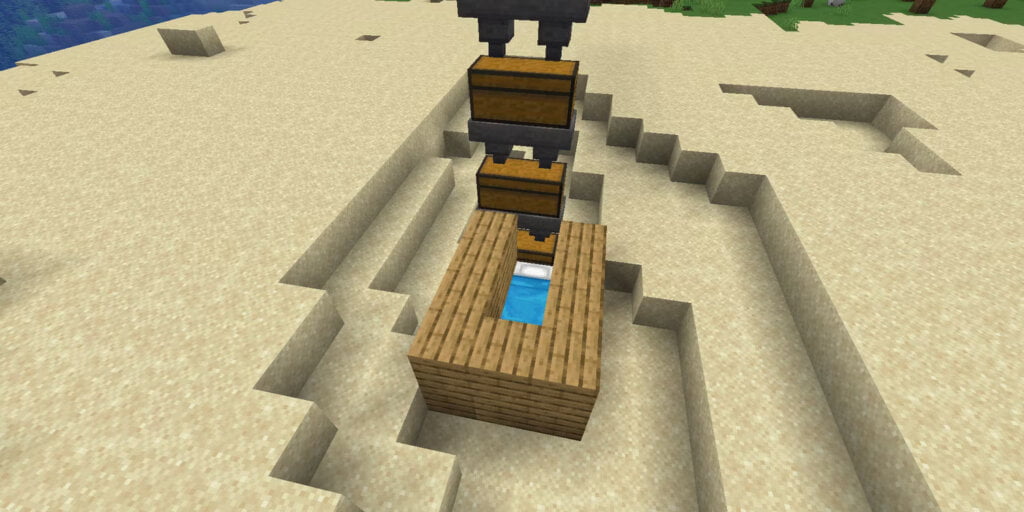
Step 7: Constructing the Collection System
- Cover the top of the villager chamber and build a collection system on one side of the farm, using four hoppers leading into a double chest. This setup will collect the iron ingots from the fallen Iron Golems.
Step 8: Lava and Signs Placement
- Above the collection system, place four solid blocks and then attach eight signs on these blocks. The signs are crucial for holding the lava in place.
Step 9: Deploying Lava and Slabs
- Carefully place lava between the signs, ensuring it’s perfectly contained. Following this, position a slab on each block under the lava to manage the flow and ensure safety.
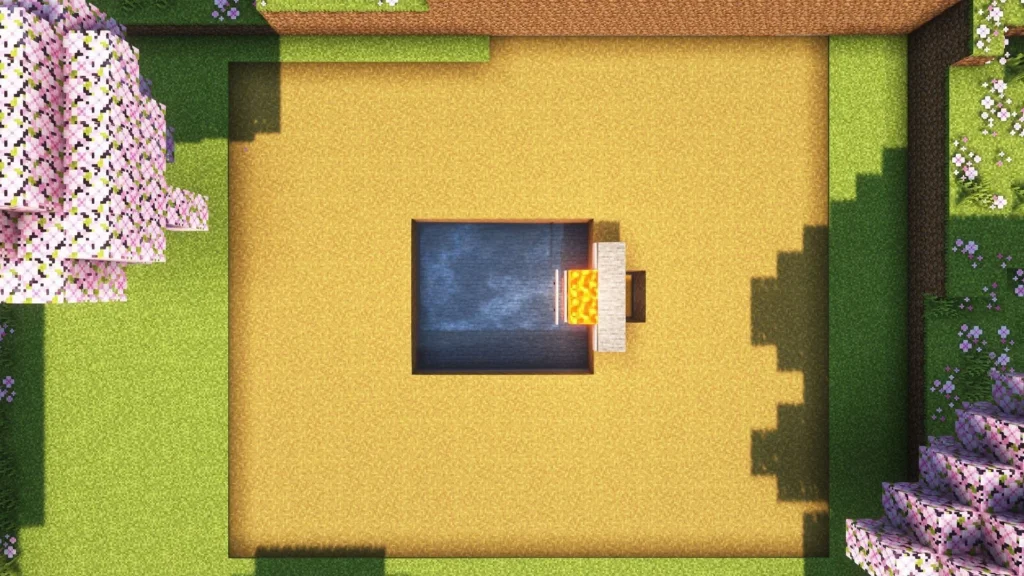
Step 10: Water Management
- On the opposite side of the lava, place water so it flows towards the lava. This water current will push the spawned Iron Golems into the lava, where they will meet their end and drop iron ingots.
Step 11: Final Touches
- Use a shovel to create path blocks around the farm. This prevents Iron Golems from spawning outside the designated area, ensuring they only spawn within the farm’s boundaries.
By following these steps carefully, you will have a fully functional iron farm that spawns and processes Iron Golems automatically. This farm will significantly boost your iron ingot reserves, allowing you to focus on other aspects of your Minecraft adventure without worrying about resource scarcity.
Also Read: The Best Shield Enchantments in Minecraft
Finishing Touches and Maintenance
Once your iron farm is operational, a few finishing touches and regular checks will ensure its longevity and efficiency. First, consider beautifying the area around your farm to integrate it seamlessly into your Minecraft base. Adding lights, pathways, or even thematic decorations can make the farm not only functional but also a visual highlight. Regular maintenance checks are crucial; ensure the collection system is not clogged, the villagers and zombie are in their designated spots, and the spawn areas are adequately lit to prevent unwanted mobs.
Conclusion
Creating an iron farm in Minecraft is a rewarding project that offers endless iron ingots, saving you time and effort in mining. This guide has walked you through the steps to build an efficient iron farm, from gathering materials to final touches. By following the instructions and maintaining your farm, you’ll have a reliable iron source that supports your Minecraft adventures, allowing you to focus on building, exploring, and crafting. Embrace the challenge and enjoy the fruits of your labor in the form of unlimited iron.